
 911
911
 Board Room Guide
Glossary
1.......................................................................................................... Keyboard and Mouse Diagrams
2..................................................................................... How to Schedule Microsoft Teams Meetings
3.............................................................................................................. Using the Poly Touch Console
4.................................................................................................................................... Using the Clicker
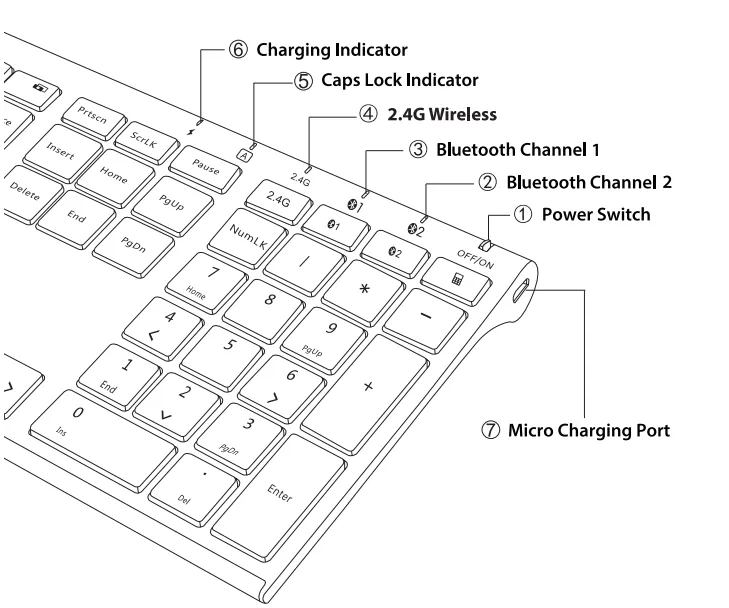
1. Keyboard and Mouse Diagrams:

2. How To Schedule Microsoft Teams Meetings
Poly Studio is a business-class videoconferencing tool allowing easy Microsoft Teams accessibility. Poly Studio works in collaboration with a dedicated PC (located behind the TV), touch console, and sound bar. This guide will go over specific features on the touch console, as well as how to schedule a meeting in the Board Room.
You can schedule Teams meetings either through Microsoft Outlook or Microsoft Teams. You should do this on your own computer, and not on the Board Room computer. Below, we’ll outline how to set up meetings through both applications
 Microsoft Outlook
1. Open Microsoft Outlook either through your desktop application or your web application. For this example, we'll be using the desktop application.
2. Select the calendar icon ![]() . Now, click on the
. Now, click on the ![]() button on the home tab's ribbon.]
button on the home tab's ribbon.]
Note: if you do not see either button, click ![]() on the top right of your screen and select
on the top right of your screen and select  . You should be able to locate the button on the left side of the ribbon now.
3. In the meeting tab's ribbon, click ![]() . This will convert your meeting into a virtual meeting with a clickable link below your message. Finish the rest of the meeting details and remember to add Board Room ([email protected]) as a required attendee along with the other attendees. Click
. This will convert your meeting into a virtual meeting with a clickable link below your message. Finish the rest of the meeting details and remember to add Board Room ([email protected]) as a required attendee along with the other attendees. Click  once you're finished. Notice how Board Room also populates in the Location section of the invitation

 Microsoft Teams
1. Open Microsoft Teams either through the desktop application or the web application. For this example, we'll be using the desktop application.
2. Click the  button on the left side of the window.
3. Click the ![]() button on the top right of the window.
button on the top right of the window.
4. Finish the rest of the meeting details and remember to add Board Room ([email protected]) as a required attendee along with the other attendees. Make sure to add Board Room in the Location section as well. Click ![]() once you're finished.
once you're finished.

Note: You can also forward an existing meeting to the Board Room, which will work the same.
Once you schedule a Teams meeting using either Outlook or Teams and invite Board Room, it will show on the Poly Studio touch console. If it is not a Teams meeting, it will still show up on the touch console, but will not allow you to join virtually.
3. Using The Poly Studio Touch Console
The touch console has easy-to-access options for Teams meetings, and for presenting during non-Teams meetings. Below displays pictures of the console, along with information about some of its features.
Touch Console Home Screen:

Touch Console More (settings):

In Teams Meeting:

4. How to Use the Clicker for Presentations
The clicker Goodwill uses for presentations is the Logitech Wireless Presenter R400

Below are the features of the clicker:

How to use clicker:
1. First, check the left side of the clicker to make sure it is switched to 'On'
2. Take out the USB dongle on the bottom of the clicker. It should slide directly out.

3. Insert the USB dongle into the PC located underneath the Polycom Touchpad. The USB port is a rectangular port with the ![]() icon next to it.
icon next to it.

4. Open and present your slide presentation. The left and right arrows will help you navigate through the presentation.

